Monday, August 23, 2010

Hidden Attribute Max Length Prevents Relationship Mapping

We have setup a custom attribute called Toll Free that we use to track 800 numbers.

In trying to setup a relationship map between the Lead and Account entity, I received the well known error:

“This attribute map is invalid. The selected attributes should be of the same type. The length of the target attribute should be equal to or greater than the length of the source attribute and the formats should match. The target attribute should not be used in another mapping.”

In looking, I noticed that we have the attribute set to a max of 25 characters in the lead and the default 100 characters in the account. Oh, well there’s the problem. I edited the attribute in the Account and shortened it. Problem solved, right?

Nope, same error. After checking all the other relationships to make sure it wasn’t used elsewhere, I was about to tear out some hair. Then I stumbled on Ronald Lemmen’s article about the error. His article didn’t solve the problem, but in the comments, someone had the solution.

image

When an attribute is created, a second database field called MaxLengthCRMAttribute set to 2x the value of the length of the attribute. Here’s the key, when you shrink the length, it doesn’t shrink the max length. However, when you increase the length, it does.

So I edited the Lead attribute that had been created, set it to 100, published then set it back to 25 and published again. After that, I was able to add the relationship because the max length field values now matched.

Friday, April 30, 2010

Modding Dynamics CRM Reports in SSRS

There are many things that can be handled natively within the Dynamics CRM structure. Every once in a while, you’ll run into something that needs a little help from the outside world. Don’t we all need a little help from time to time? bill-nye-globe

A good example of this would be adding a logo to a Quote or Sales Order. No good way to do that within the CRM framework itself. However, thanks to the open nature of the Dynamics CRM solution, it’s fairly easy to modify the report outside of CRM, make our changes and then import it back in.

For this example, we’re going to modify the Quote form and add our companies logo. You’ll need to have at least a basic understanding of how CRM works, as well as Visual Studio or Visual Studio Business Intelligence Design Studio (BIDS) and SQL Reporting Services (SSRS).

Overview

Reports in Dynamics CRM are actually SSRS reports, wrapped in a CRM framework that passes report parameters, user authentication and other information over to the report to give it the context in which it should run.

Within SSRS, reports generally are not built directly on the Tables / Fields stored in SQL. Microsoft provides objects called Filtered Views that wrap all of the raw data in the context of the security available to the user running the report as well as the context of where the report is being run, including what records to run the report against. These are all parameters passed by the CRM wrapper that surrounds the SSRS report when presented from within Dynamics CRM.

Filtered-Views

Exporting Reports

We start by locating the report in the Report Center. To find the report center, click Workplace and then reports.

To export the report, click the Edit Report button, then choose Download Report from the Action Menu. Save the report into a project folder where you’ll be storing the files for this project.

This .RDL is what we’ll be editing in BIDS to make our changes.

Modifying the Report – Fixing the Data Source

Open your BIDS app and create a new report server project. On the right side, right-click the Reports folder and choose Add existing reports. Navigate to the report.rdl file that you downloaded and bring it into the project.

Weird CRM thing here…: When CRM exports the RDL file it normalizes it for editing (code phrase for I don’t know what it’s doing, but it changes some things around). One of the thing that happens on a regular basis is that the datasource that’s embedded in the RDL file gets reset to the default CRM company Adventure_Works_Cycle_MSCRM. You’ll need to reset that.

Click the Data tab and then the […] link to the right of the dataset selector.

DatasetOpen the dataset and hit the […] again to get to the Connection string. Correct the server name (which will likely have defaulted to localhost) and the catalog (enter the name of your company’s CRM database)

Dataset2 

Making Changes

Go ahead and make your changes to the report. Remember if you have to rebuild the SQL query to use the Filtered Views whenever possible. These provide the prefiltering capability to the user and wrap the report in the security context of the user to prevent unintended data visibility.

When you are done making changes, you now need to upload the report to CRM.

Uploading the report

After your changes have been made, you’ll want to upload the report to Dynamics CRM.

Please, please, please: Save that original report file somewhere you can get back to. I’m not saying you might going to screw something up, I'm saying you WILL screw something up someday and it’s a lot easier to republish that original .RDL file than to try and restore it back in.

Edit the report you want to replace and click the Browse button.
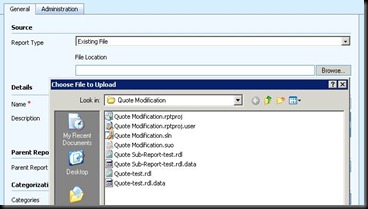
selectrdl There you go, you’ve modified your first Dynamics CRM SSRS report. Don’t you feel like you’ve accomplished something!

A better solution is to create a new report and upload the .RDL file to that, leaving the original one. This gives you something to roll back to in case … um, SQL screwed something up.

Sub-Reports

Note that some of the report (quotes, sales orders, invoices) present their data through sub-reports. These are framed into the main report. The sub-reports would also need to be downloaded and modified. To find these, change the default filter view for the Reports listview to All reports, including sub-reports.

allreportsview

This article is based on an ExpertsExchange tip by member CRM_INFO. The thread is located here -http://www.experts-exchange.com/Microsoft/Applications/Microsoft_Dynamics/Q_24348850.html

Tuesday, April 6, 2010

Hidden Mappings in Dynamics CRM

The source for this post is an article by Jamie Miley, located here.

While working on a Dynamics CRM v4.0 project for a client, I need to map a custom attribute from the Quote Product form to the Sales Order Product form. After searching through the mappings, I determined it wasn’t available. Well, actually, it’s available just hidden from common view.

To find it, run the following SQL query against the <orgname>_MSCRM database -

Select * from entitymapbase where targetentityname = 'salesorderdetail'

Find the row that has the appropriate SourceEntityName and copy the GUID for that row. Use the following URL and paste the GUID at the end.

http://<yourservername>:<port>/Tools/SystemCustomization/Relationships/Mappings/mappingList.aspx?mappingId=

This brings up the hidden mapping and the best part is that this is a supported workaround!

Wednesday, March 31, 2010

Updating ReadOnly and Disabled Fields

This is a repost + comments from an article by Ryan Farley. Many thanks to him and the information he puts out. The full article is located here >>. Relevant portions are copied below.

When you need to set fields disabled or readonly at runtime, you need to keep in mind the type of field you use. Setting a HTML input field is a simple line of Javascript, however, the type of CRM field you've chosen will have an impact on exact items you need to change at runtime. I personally like the look of disabled over readonly. A disabled control will show it's value greyed, indicating to the user that they cannot modify it's contents. A readonly field appears normal. The user only finds out that they cannot change it's value until they attempt to do so.

readonly-disabled

Use the following code to toggle the field status -

// set it as readonly
crmForm.all.new_textfield.readOnly = true;
// OR set it as disabled
crmForm.all.new_textfield.disabled = true;


Here’s the tricky part. By default, read-only fields aren’t saved back to the database. Makes sense, right. However, what if you’re updating a field with some code and want that value saved even though you don’t want the user to be able to change it?

Use the ForceSubmit action.

crmForm.all.<field>.DataValue="some value";

crmForm.all.<field>.ForceSubmit = true;

Tuesday, March 30, 2010

Setting defaults for System Fields in CRM

In Dynamics CRM v4.0, the system fields don’t allow you to set a default value. Unfortunate, but there are ways around it.

Add the following code to the OnLoad event for the form. Add as many defaults as you need. The code checks to see if this is a new form (CRM_FORM_TYPE_CREATE) and then sets the values you provide.

//Set default values for system fields
var CRM_FORM_TYPE_CREATE = "1";

if (crmForm.FormType==CRM_FORM_TYPE_CREATE)
{
crmForm.all.fieldname.DataValue = 60;
}

Requiring 1 of X fields in CRM

There may be times when you don’t want to require one specific field to contain data, but at least one in a group. An example would be deciding that we can’t enter a lead if we don’t have a way to contact the lead – phone number, email, mobile, etc.

What we have to do is make sure that at least one of the contact fields for a lead contain data. There’s no way to make sure this happens. We could set them all Business Recommended, but that tells the user that they should all be filled in if possible and that’s not what we need.

Gather the actual names of the fields you want in the required group.

Use the following code to require at least one of the fields to contain data in order to save. Note that this example is based on the Lead form. Place the code in the OnSave event for the form.

The first portion is a concatenated If statement that checks each of the fields for data. If the entire statement evaluates as false, then the second portion of the code pops a prompt to the user letting them know why the save failed and then stops the save process.

Also, the if statement is all on one line, even though it wraps below and

//Contact Check
//Check for at least one contact method
{
if (crmForm.all.telephone1.DataValue==null && crmForm.all.emailaddress1.DataValue==null && crmForm.all.mobilephone.DataValue==null && crmForm.all.telephone3.DataValue==null && crmForm.all.telephone2.DataValue==null && crmForm.all.websiteurl.DataValue==null)
{
alert("Provide at least one phone number or an email address");
event.returnValue=false;
return false;
}
}

Thursday, October 29, 2009

Displaying Document Libraries in other sites

A client recently asked for a modification to Business Portal - Requisitions Management. They wanted to post a library for supporting documentation (quotes, product spec sheets, etc.). The problem is that they wanted it visible in both the Employee Purchase Request entry screen and the Purchasing Requisitions management screen and these pages are in two entirely separate sites.

As you may know, SharePoint is great at showing content from all the libraries you set up....as long as they are within the same site. Site A has no clue that Site B even exists.

The key for this solution came down to using the Page Viewer web part. This web part allows you to display another website within a window on another page.

The next challange is that SharePoint pages all include navigational borders and headers. When you display a SharePoint page within another page, all this flotsam is included, making a really confusing page. Here's how I worked around this issue.

Step 1: Setup your document library. Because I wanted to make sure that all users could get to the library, I set it up in the main Business Portal site. You can add permissions to the library if you need to in order to keep the right people in and the wrong ones out. Add any custom fields you might need to help find your documents more quickly. In this case, I added a mandatory Requisition ID field and an optional description field.

Step 2: Create a view for the document library that only shows the columns you'll want displayed on the other page.

Step 3: Create a new blank page that we'll use to display the document library in a web part. We'll be adding code to hide all of the navigational elements, so we don't want to do this on a page that's needed for something else. In this case, I went to the Business Portal Common Pages library and added the new page there, calling it RequisitionDocs.aspx

Step 4: Add the document library web part to the page.

Modify the web part to your liking. For me, I like to remove the ability of the user to do anything bad, like deleting the web part, moving it around, etc. I put it there for a reason, now you leave it alone! :) You'll also want to either have no title showing or show the title only. Select the view for the document library that you created above.

Step 5: Add another web part - the Content Editor web part. This is where we'll hide everything else on the page like the borders, the header...all that junk. In the content editor page, paste the code found on this page: http://vspug.com/spfromscratch/2007/12/18/blank-page/

NOTE: Take the "*" characters out of the word "java*script and don't forget the colon after the work "java*script"

As soon as you save the content, the page should change dramatically. If you're brave, you can remove the link at the bottom. Just remember though that you need a way to get back into edit mode so DON'T hide all your titlebars!

Step 6: Now that we have the page built that we want to display, we can link to it from our source pages. Edit the page where you'd like to display the library and add the Page Viewer web part. Modify the web part and add the url to your document library to the Link field. In this case, the URL would be http://dynamics-web/BP/Business%20Portal%20Common%20Pages/RequisitionDocs.aspx

Adjust the web part to be the way you want it on the page and Viola!

To take it further, the list view that I created had title that you could click on which then loaded the document library in my web part...bringing back all the navigational nastiness. To get around this, change the titleurl field in the document library on the display page (requisitiondocs.aspx). Instead of pointing to the document library, use the hash character instead (#).

Another problem is that in the default views for the document library, there's an "Add new document link" that again loads a full page for uploading documents. Sheesh, I try to get out and they keep pulling me back in! To get around this, edit the document library web part on your display page and change the toolbar type to "No Toolbar".

I have quite a few sources to thank for this, most of all is the code for hiding the nav elements. I found it posted on this page - http://vspug.com/spfromscratch/2007/12/18/blank-page/

The tip for hiding the Title URL was found here - http://social.msdn.microsoft.com/Forums/en-US/sharepointcustomization/thread/ac235b36-b516-40d3-bd2d-ea7dccd8eef1 and the tip on hiding the "Add new document" link was found here - http://social.msdn.microsoft.com/Forums/en-US/sharepointcustomization/thread/9561ff37-bd33-44ec-be45-82f0fcd868db
